

Hi, SSSC-Growers!
In this article we will try and give you an overview over the different germination methods used for cannabis seeds and then tell you our preferred way of starting SSSC-seeds. In general cannabis seeds germinate best at a warm temperature of around 21-26 degrees Celsius.
We have personally tested all the described methods in a side-by-side germination test already years ago and found them to be almost equally effective, if done correctly.
It strongly depends on the growers personal preferences (e.g. organic-grower, soil-grower, hydro-grower etc.), which method of germination is best suited for him individually. Somebody who wants to grow purely organic, will not want to use rockwool-plugs as starting media out of principle. A hydro-grower on the other hand will not want to start the seeds directly in soil, when he later continues his grow on rockwool-cubes.
The best way to germinate cannabis seeds:
a) directly in soil
b) in rockwool cubes
c) on wet paper towel
a) Germination directly in soil:
In nature a seed will start its germination on or in the ground as soon as it comes in contact with enough water. The water will permeate into the seed-shell and start the germination process inside, the small plant-embryo inside the seed will then start to grow. If it stays wet enough and does not dry out during the germination process, the plant will grow into a small seedling. As growers we want to re-create this natural process.
Therefore, the first thing to do is putting the seeds into a small glass of water and let them soak there for 24 hours.
There is special planting soil for seedlings (which is not fertilized) you can buy at any gardening shop, or you can simply use a light-mix (=soil with perlite) for cannabis (which is only slightly fertilized).
It is very important to put the seed NOT too deep into the soil when you plant it! The deeper you put it into the soil, the more the seedling has to fight to reach the surface.
The maximum depth a seed should be buried is about two times its own diameter, therefore with a cannabis seed that is about 5 mm deep!
The seed is planted with the TIP OF THE SEED POINTING DOWNWARDS into a small hole in the center of the pot and then covered with soil.
The WHITE TAP-ROOT that will grow out of the seed, WILL ALWAYS GROW OUT OF THE TIP OF SEED and then search its way downwards into the soil. Therefore it is important to put the seed into the soil in the correct position, this will ensure that your roots don’t get tangled and your plant can develop quickly.
The small pots are put under a grow-lamp (e.g. T5, LED, HPS, MH) and after 24 to 48 hours in the soil the stem of the seedling should start to show and poke out of the soil. The first set of round leaves, the so called cotyledons, will open up and the seedling can start photosynthesis and start growing.
b) Germination on rockwool cubes:
Rockwool Cubes are especially designed and produced as a sterile growing medium for plants and come in different standard sizes for easy re-planting. The smallest cube-size (25-36 mm side-length) is used for the germination of seeds.
First the rockwool cubes MUST BE soaked in ph-adjusted water (ph=5,5) for 2 hours in order to get their ph-value to 6,0 (they are ALWAYS produced with a ph-value of 7,5, which is much too high for cannabis and MUST be neutralized first!) and then the excess water is drained.
Now the rockwool cubes are ready for use. They can be either be soaked again, this time in a mild nutrient solution (EC=0,3) with a ph of 6,0 or used directly.
The rockwool cubes are put into special trays, which hold 77 to 125 little cubes.
Each cube has a tiny hole on the top, which is made to hold the seed.
The seed is carefully (with a pincet) put into the tiny hole with THE TIP POINTING DOWNWARDS, in order to make sure the root grows downwards.
The tray holding the rockwool-cubes has to stay moist at all times during the germination process.
Now it takes appr. 48-72 hours under a grow-light for the seedling to appear and grow out of the top of the rockwool cube.
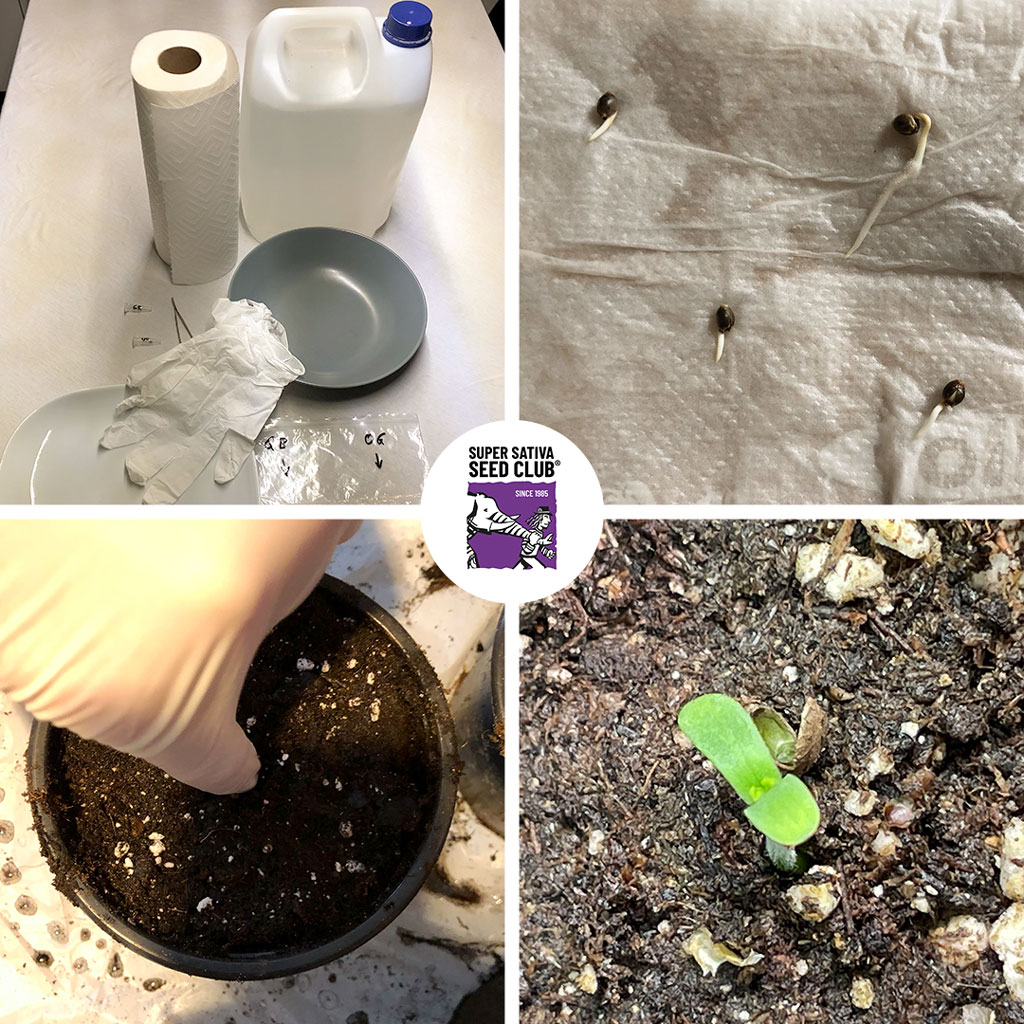
c) Germination on wet paper towels:
As alternative to starting your seeds inside the growing-medium (e.g. soil-, peat, rockwool) you can pre-germinate them on wet paper towels and let the white tap-root grow out of the seed-shell before you transplant the seeds into your preferred growing medium.
The seeds are put on one half of a wet paper towel, which is then folded over to cover the seeds from both sides. After all air-bubbles are carefully pressed out of the folded wet paper-towel and insuring that the seeds are completely encased inside, the paper-towel is put inside a zip-loc plastic baggy. The bag is closed and then hung up at a dark place (e.g taped to the inside of a closet-door). By hanging the seeds inside the bag instead of laying them on a plate, you ensure that the white tap-root can grow out of the seed-shell STRAIGHT and does not curl up in a circle. This will later enable you to transplant the germinated seed easier into the growing medium. After 48-72 hours inside the plastic bag and encased by the wet paper-towel the seeds will have opened up and the white tap-root should have grown out of the seedling for about 5-10 mm. Now they can be taken off the wet paper-towel with a pincet (VERY CAREFULLY without hurting the fragile white tap-root!) and planted into the growing medium with the WHITE ROOT POINTING DOWNWARDS! Since the seed has started its germination already, it does not need to be buried deep. The best way is to put it into a small hole in the soil with the seed-shell still peaking out of the soil a little bit. This way it can start to grow upwards right away and you will have a tiny plant already 24 hours after transplanting the pre-germinated seed into the soil and putting it under a grow-lamp.
Here at the SSSC we prefer to grow organic (see Karel’s ‚Bio Grow-Book‘) and therefore we prefer to germinate in soil.
Here is our little step-by-step guide to germination success in soil:
1.) Soak the seeds for 24 hours in a small glass with distilled water
2.) Fill a small pot with potting soil or light-mix
3.) Water the soil well with ph-neutral (ph=6,0) water, but make it not too wet (not soggy!)
4.) Make a small hole in the center of your pot
5.) The hole should be appr. 5 mm deep and wide (e.g. you can use your small finger)
6.) Place the seed in the center of the hole with the TIP OF THE SEED POINTING DOWNWARDS!
7.) Cover the hole with soil and carefully push the soil from all sides inwards to make sure the seed is well enclosed inside the soil
8.) Push down and compress the soil at the outside, directly at the walls of the pot, in order to make a little ring around the whole pot. This ring is for drainage while watering. It makes sure the seed does not get flushed out of the soil at the beginning and later prevents the stem from standing in water and starting to rot.
9.) Water the little pot from time to time, by pouring a little water into the ring on the outside, before the soil gets too dry. The water will be sucked towards the center of the soil right away. Try to avoid pouring water directly into the center of the pot, in order to avoid flushing out the seed per accident!
We hope you find the germination method that fits best to your growing style and wish you lots of success with your SSSC-seeds!
(3642) (0)